Your images might be the single biggest reason your WordPress site is failing Core Web Vitals. Not because they’re large in dimensions, but because they’re being served in the wrong format. PNG files that could be 50 to 70 percent smaller in a modern format are still loading on millions of sites in 2026, quietly dragging down LCP scores and frustrating mobile visitors in the process.
Here’s the shift that changes everything: WordPress 6.5 made AVIF support native. No workarounds, no specialized server configurations just to upload the file. The platform now supports the most efficient image format available right out of the box, and most site owners haven’t touched it yet.
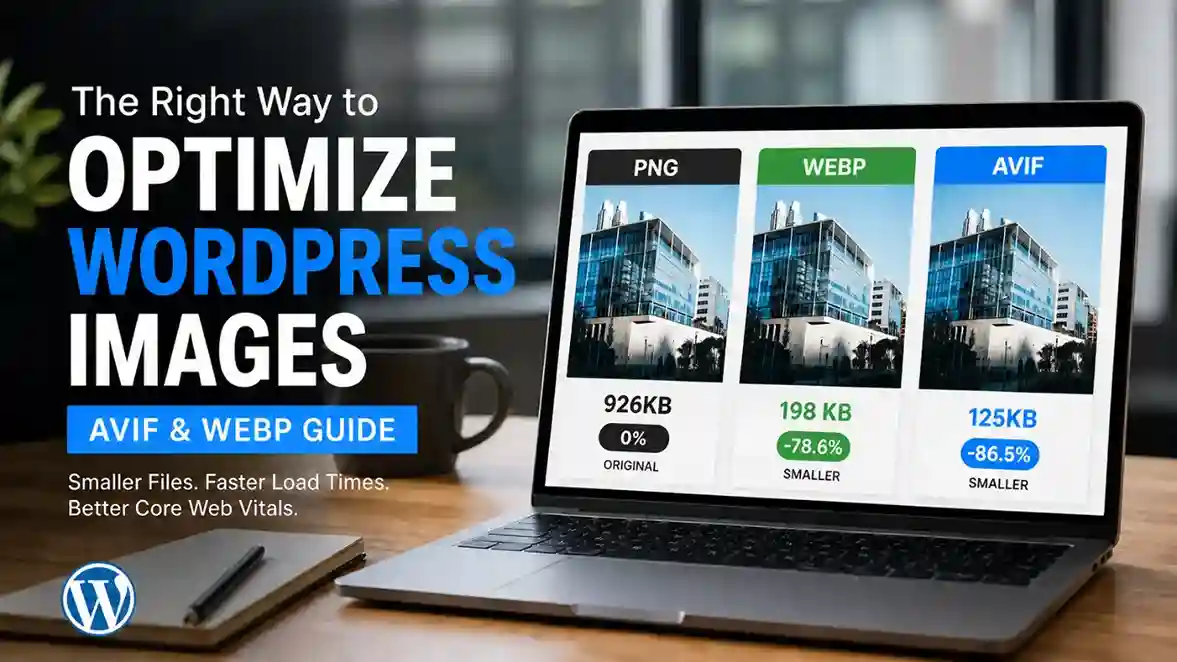
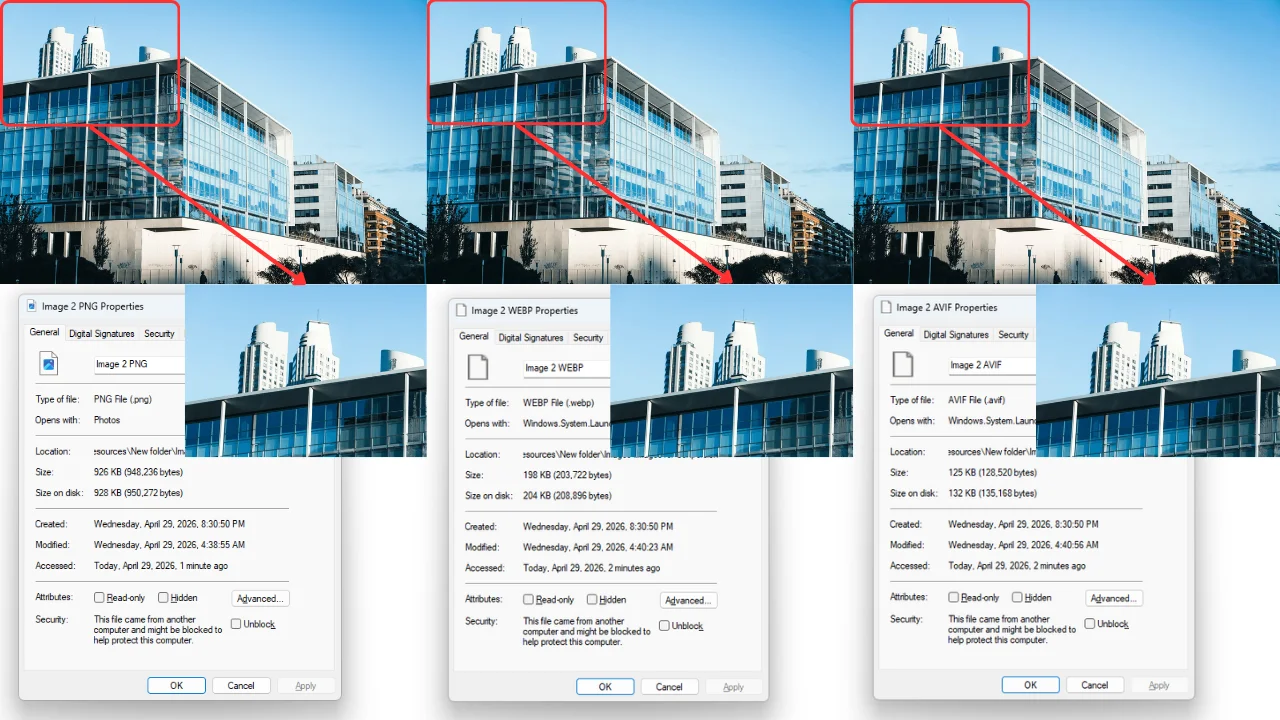
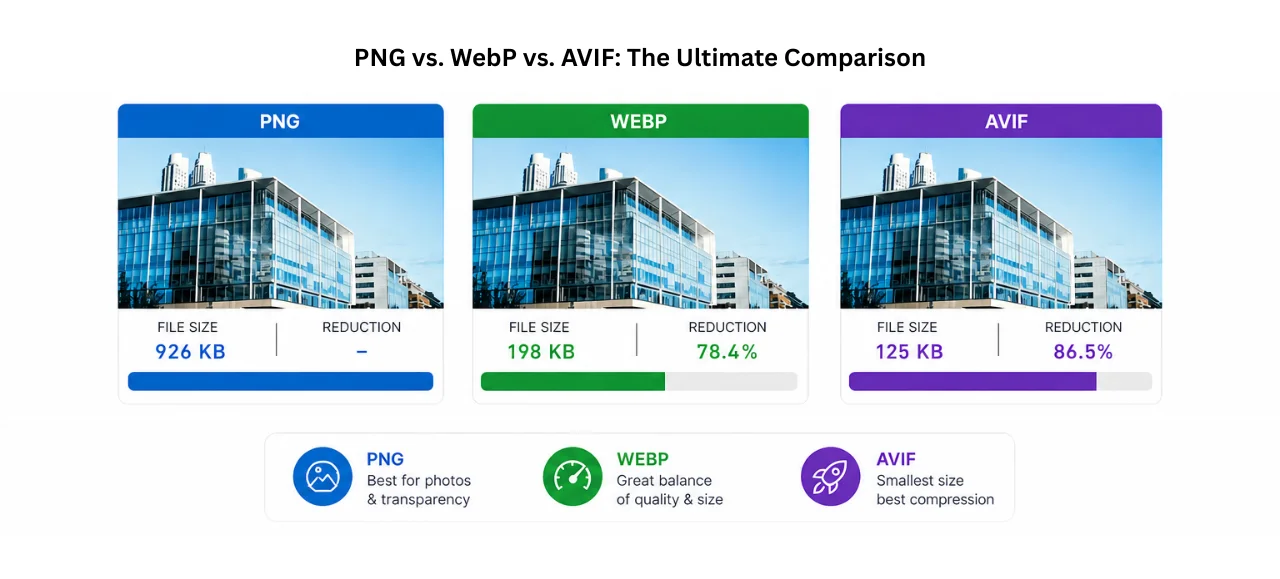
When comparing PNG vs WebP vs AVIF for WordPress, the numbers make a compelling case for switching. PNG is a lossless format, which means it preserves every pixel perfectly but produces significantly larger files, especially for photographs and complex imagery. A PNG photo that’s 900KB can often be converted to WebP at under 300KB with no visible quality difference. AVIF takes it even further, frequently delivering the same image at under 220KB.
AVIF files are typically 20 percent smaller than equivalent WebP images at the same visual quality. WebP is already 50 to 70 percent smaller than PNG for photographic content. Moving from PNG to AVIF isn’t a marginal tweak. It’s a dramatic page weight reduction that directly affects how fast your pages load for real users on real mobile devices.
That said, WebP still has broader legacy browser support. Older versions of Safari, Edge, and certain mobile browsers that don’t support AVIF will handle WebP just fine. This is why the best image optimization strategy in 2026 serves AVIF to browsers that support it and falls back to WebP (or the original PNG) for everyone else. This guide walks you through exactly how to implement that, how to verify it’s actually working, and what to do when it isn’t.
⚠️ Stop and Check Before You Start: Server Requirements for AVIF
While WordPress 6.5 supports AVIF natively in the admin, your web host must have the correct image processing libraries installed on the server for AVIF generation to work. Specifically, you need ImageMagick compiled with AVIF support or GD with libavif. If you’re on cheap shared hosting, AVIF bulk conversion might silently fail with no error message and the plugin will just report success while skipping the AVIF files entirely.
Before running any bulk AVIF conversion, send a quick message to your host’s support team: “Does your server support AVIF image generation via ImageMagick or GD with libavif?” If the answer is no, stick to WebP only for now. WebP is supported virtually everywhere and still delivers a massive improvement over PNG.
PNG vs WebP vs AVIF: Which Format Should You Use?
Here’s the practical comparison most guides skip:
| Format | Browser Support | Compression Type | File Size vs PNG | Best Use Case |
| PNG | Universal | Lossless | Baseline | Transparency, logos, screenshots, UI graphics |
| WebP | 96%+ of browsers | Lossy and Lossless | 50-70% smaller (photos) | Modern replacement for PNG and JPEG both |
| AVIF | 90%+ of browsers | Lossy and Lossless | 60-80% smaller (photos) | Best quality-to-size ratio, use where supported |
| JPEG | Universal | Lossy | Varies | Legacy fallback for photographs without transparency |
💡 Why PNG files are so large: PNG uses lossless compression, meaning every pixel is stored exactly as captured with no quality trade-off. This is ideal for logos, interface screenshots, and graphics where sharp edges and flat colors need to stay pixel-perfect. For photographs, however, lossless compression produces files that are three to five times larger than necessary. That’s where WebP and AVIF offer transformative savings without any visible quality loss.
The practical recommendation for most WordPress sites in 2026: Serve AVIF to browsers that support it, WebP as the first fallback, and the original PNG for the rare browser that supports neither. This is called a fallback chain, and a good plugin handles it automatically. Both WebP and AVIF support transparency just like PNG, so you don’t lose that capability when switching formats.
The Big Decision: Cloud Processing vs. Local Server Processing
Before installing anything, you need to answer one question. Where will the actual conversion work happen?
Converting thousands of images from PNG to WebP or AVIF is CPU-intensive. Every image gets decoded from its lossless PNG format, re-encoded in the new format, and saved. PNG files are often large to begin with, which means both the read and write operations are heavier than converting a JPEG. On a large media library, this can mean very significant server load.
Cloud-Based Processing (Recommended for Shared Hosting)
Plugins like Optimole and Imagify (in cloud mode) offload conversion entirely to external servers. Your WordPress site sends the original image, the cloud service converts it, and the optimized version comes back. Your hosting server does none of the heavy lifting.
This is the right approach for shared hosting. Triggering a bulk conversion job on 2,000 images on a cheap shared server can cause PHP timeouts, temporarily spike resource usage to the point where your host throttles you, or in extreme cases get your account flagged for excessive CPU usage.
Cloud tools typically also serve images through their own CDN, which adds a delivery speed benefit on top of format optimization. The trade-off is ongoing subscription cost and dependence on a third-party service staying operational.
Local Server Processing (Safe for VPS and Managed Hosting)
Plugins like EWWW Image Optimizer, Converter for Media, and ShortPixel (in local mode) process images directly on your server and store converted files alongside the originals in your uploads folder.
This keeps your media library fully self-contained without any external dependency. On a VPS or managed WordPress host, local processing is generally safe. On entry-level shared hosting, process images in small batches of 100 to 200 at a time rather than running a full bulk conversion in one go.
Quick Recommendation:
- Shared hosting: Use Optimole or Imagify cloud processing
- VPS or managed hosting: Use EWWW Image Optimizer or Converter for Media for local processing
Step-by-Step: Bulk Convert WordPress Images to WebP and AVIF
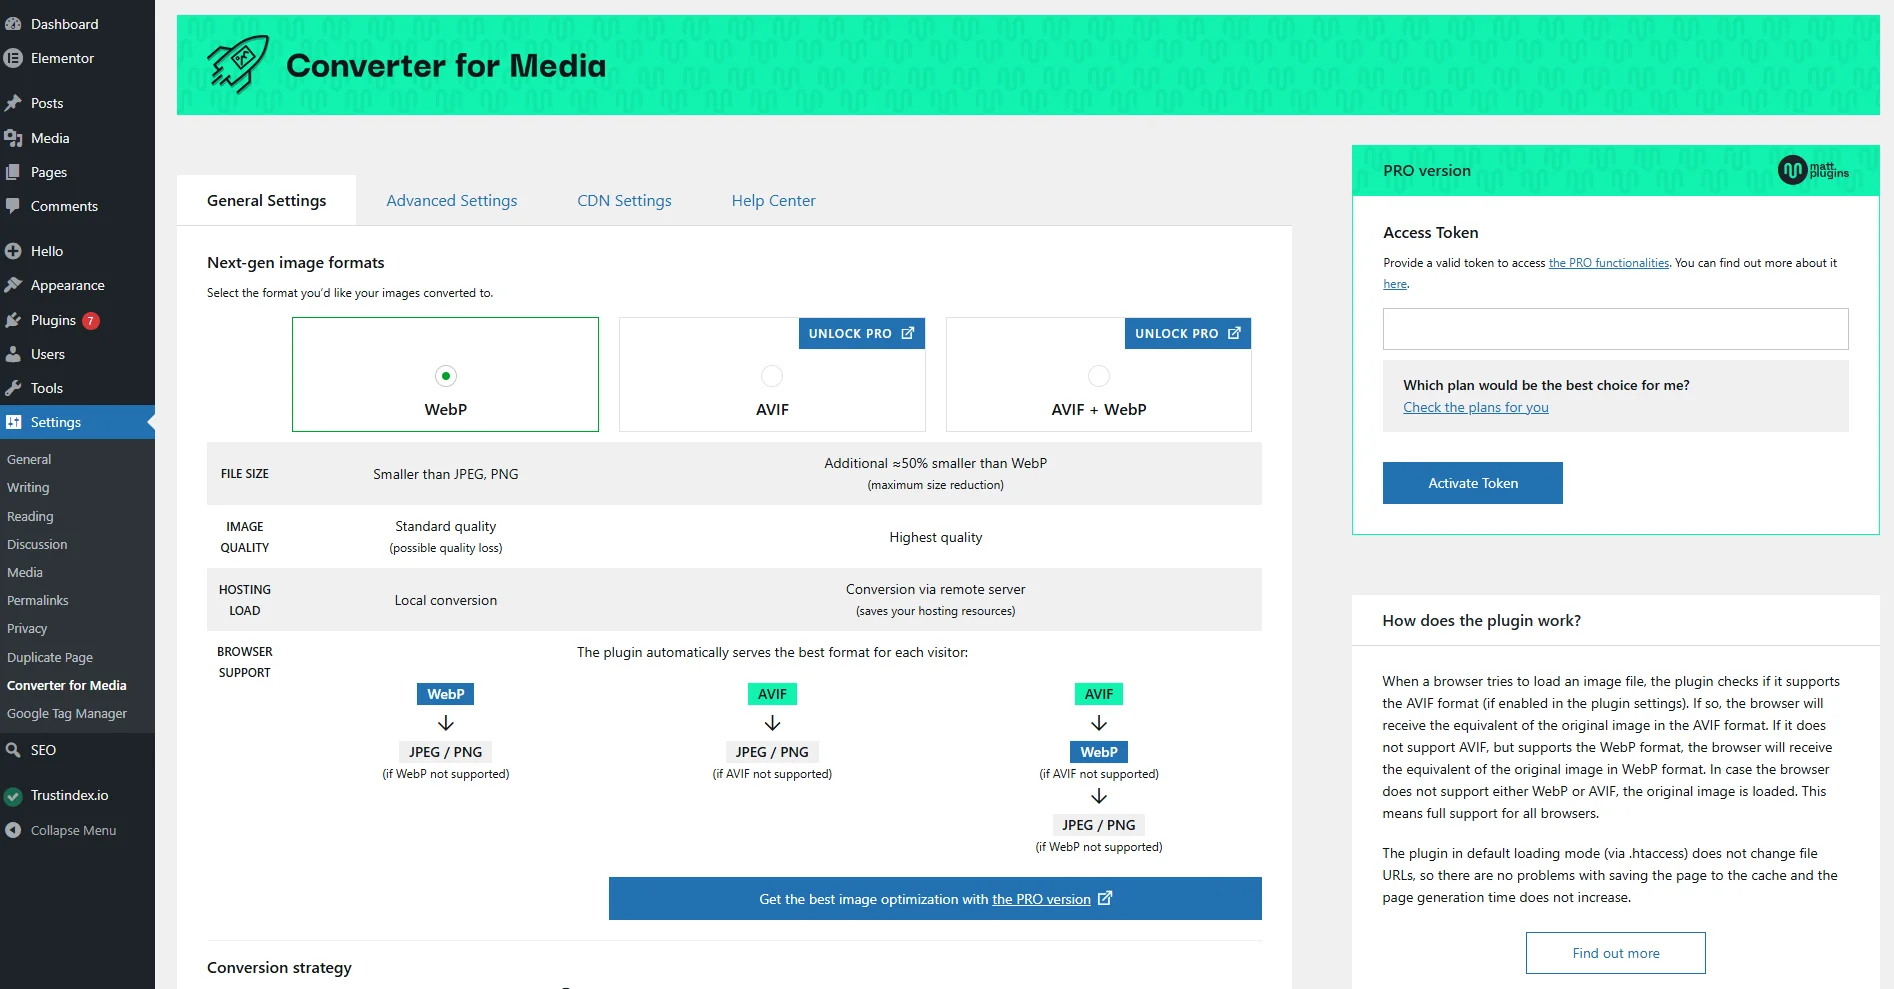
This tutorial uses Converter for Media, one of the most straightforward plugins for this task. The same general steps apply to Imagify or ShortPixel if you prefer those tools.
Step 1: Install and activate the plugin
- Go to Plugins > Add New
- Search for “Converter for Media”
- Click Install Now then Activate
- The plugin adds a new menu item under Settings > Converter for Media
Step 2: Configure your output formats
- Open the plugin settings
- Under the conversion section, enable both WebP and AVIF output
- Set AVIF quality to 60-75 for the best size-to-quality balance
- Set WebP quality to 80-85
💡 How the Fallback Chain Works: When a visitor’s browser requests your image, the server checks the Accept header the browser sent. If it includes image/avif, the server serves the AVIF version. If it includes image/webp, the server serves WebP. If neither, it serves the original. The URL in your HTML never changes. This all happens at the server level silently and automatically.
Note: Some plugins (like Imagify and ShortPixel) use a different approach. Instead of server rewrite rules, they modify your HTML to wrap images in a <picture> tag with multiple sources. If you inspect your page’s source code and see a <picture> element, that’s why. Both methods work correctly. Server rewrite rules tend to cause fewer conflicts with page builders, while <picture> tags are more portable and work even on CDN-delivered pages.
Step 3: Test a single image before bulk converting
- Upload one new PNG through your Media Library
- Visit a page where that image appears
- Use the Chrome DevTools verification method below to confirm it’s being served as WebP or AVIF
- Only proceed to bulk conversion after confirming a single image works
Step 4: Run the bulk conversion
- Go to the bulk optimization section in the plugin
- Click Convert All
- Do not close the browser tab while it’s running
- On a large library, this can take anywhere from a few minutes to over an hour
- Most plugins include a pause and resume button if you need to stop midway
Step 5: Confirm converted files exist
- After bulk conversion completes, the plugin shows a count of converted images
- Verify via FTP or your host’s file manager: alongside each original .png file in your uploads folder, you should now see a matching .webp file and a .avif file
- If you see .webp files but no .avif files, your server likely doesn’t have AVIF library support (refer to the warning at the top of this guide)
According to Google’s web performance guidance, switching to modern image formats is one of the most effective ways to reduce page weight and improve LCP scores. It’s also one of the quickest performance wins since it doesn’t require any changes to your content or layout. While formats like PNG were traditionally the default, Google introduced more efficient alternatives such as WebP, which you can explore here: Google’s WebP Documentation More recently, Google has also embraced AVIF as a next-generation format with even better compression efficiency, as highlighted in their announcement: Google’s official AVIF support announcement. By using WebP and AVIF where appropriate, you can significantly improve loading speed while maintaining high visual quality.
How to Convert WordPress Images to WebP Without a Plugin
If you’d rather not use a plugin, you can convert images before uploading and take advantage of WordPress’s native WebP support (since version 5.8) and native AVIF support (since version 6.5).
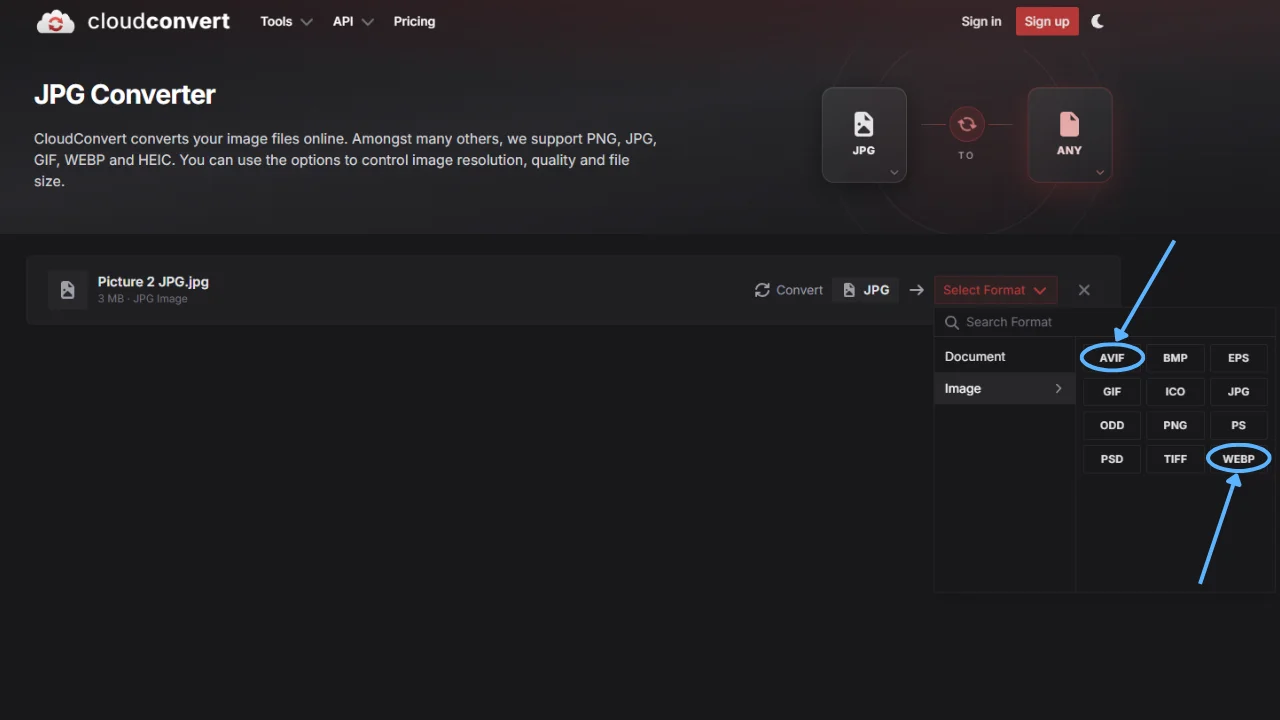
Using CloudConvert
CloudConvert is a browser-based tool that converts images to WebP or AVIF with no software installation required.
- Upload your PNG file
- Select WebP or AVIF as the output format
- For AVIF: set quality between 60 and 80
- For WebP: set quality between 75 and 85
- Download the converted file and upload it directly to your WordPress media library
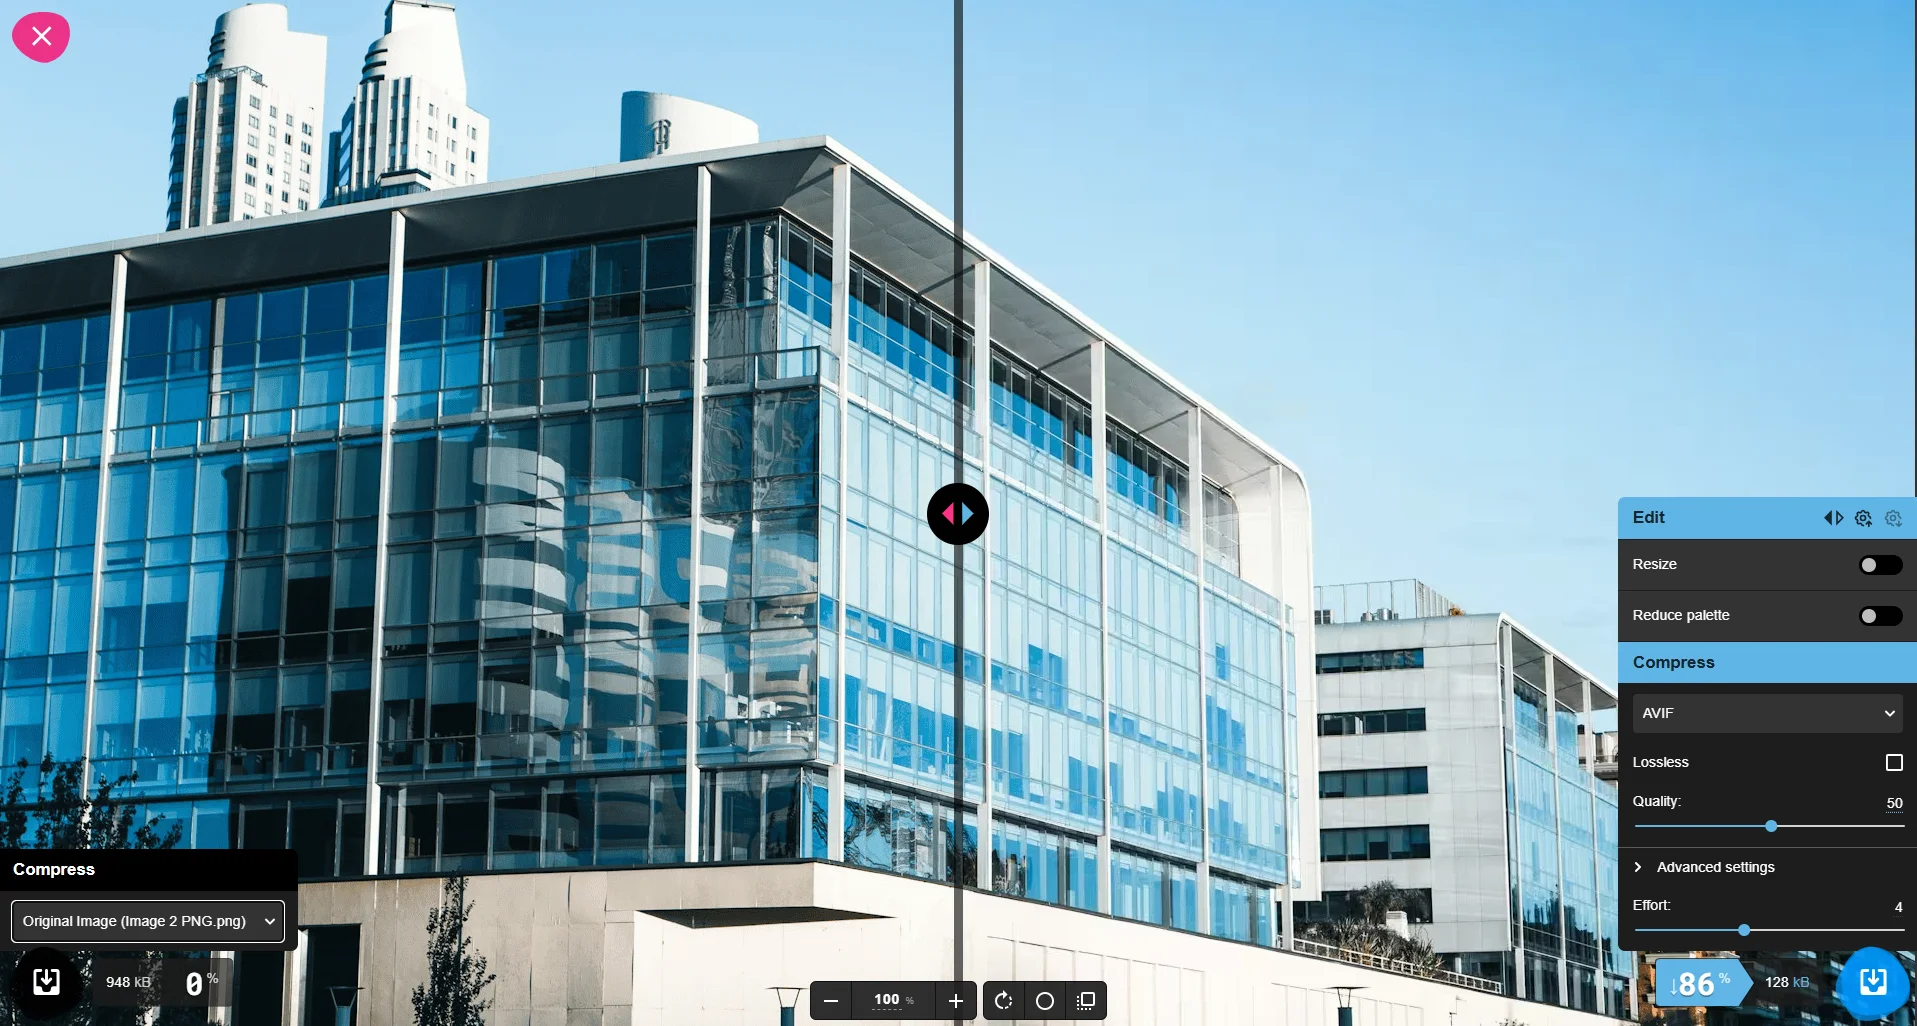
Using Squoosh for Single Images
Google’s Squoosh tool runs entirely in the browser and gives you granular control over output quality for both WebP and AVIF. It shows a live side-by-side comparison of the original versus the compressed version along with the exact file size of each, which makes it easy to find the right quality setting visually before committing.
The limitation of manual conversion: This works well for new uploads going forward, but it doesn’t solve your existing media library. For that, a plugin-based bulk conversion is still the most practical approach. Use manual conversion for teams with a disciplined pre-upload workflow or for sites with small libraries under 50 images.
How to Verify Your WordPress Site Is Actually Serving AVIF and WebP
Installing a plugin and clicking convert doesn’t guarantee your images are being served in the optimized format. Server configuration issues, caching conflicts, and CDN settings can all silently prevent the conversion from working even when the plugin dashboard shows a success message.
Here’s how to verify it with certainty using Chrome DevTools.
How to Check if WordPress Is Serving AVIF and WebP via Chrome DevTools
Step 1: Open your WordPress site in Google Chrome.
Step 2: Right-click anywhere on the page and select “Inspect” from the context menu.
Step 3: Click the “Network” tab at the top of the DevTools panel.
Step 4: Press Ctrl+Shift+R (Windows) or Cmd+Shift+R (Mac) to do a hard reload. This forces all assets to reload fresh rather than from your browser’s local cache.
Step 5: Click “Img” in the filter row to show only image requests.
Step 6: Click on any image filename in the list.
Step 7: In the panel that opens on the right side, click the “Headers” tab.
Step 8: Scroll down to “Response Headers” and look for the “Content-Type” entry.
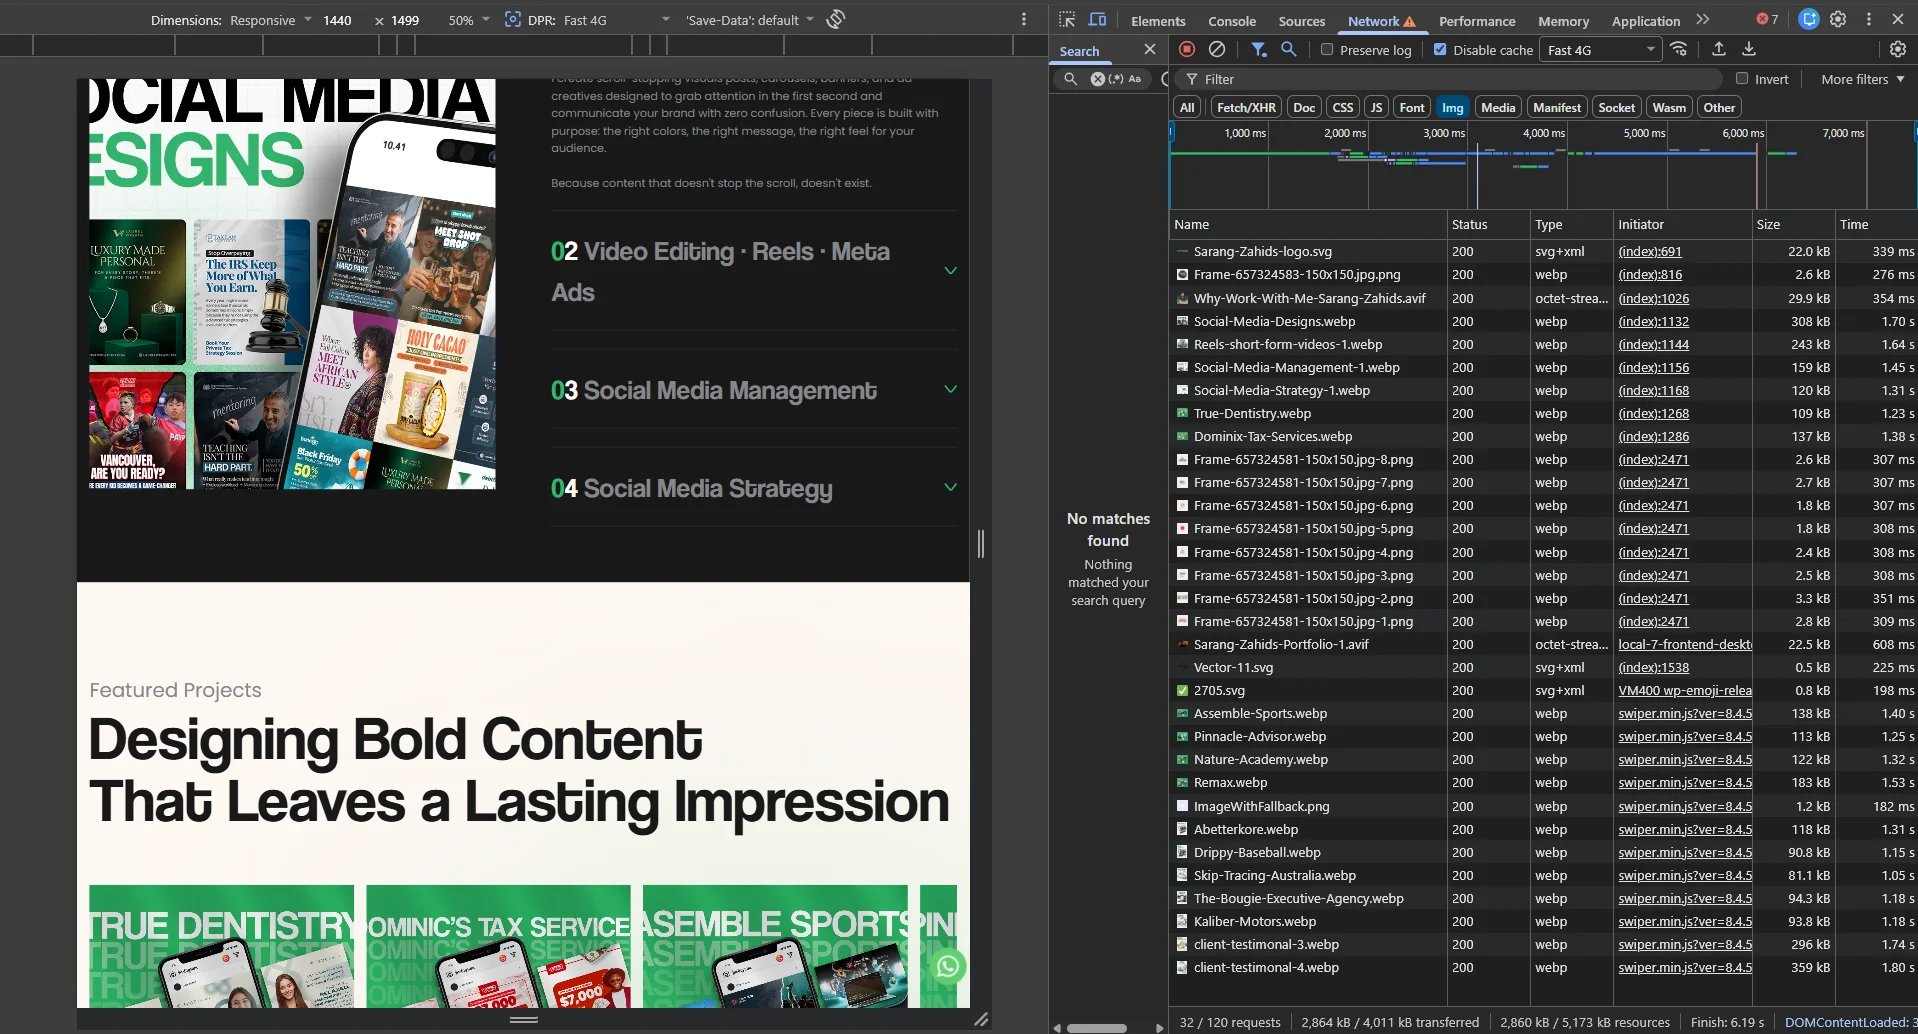
What you want to see:
- content-type: image/avif means AVIF is being served correctly
- content-type: image/webp means WebP is being served correctly
- content-type: image/png or image/jpeg means the optimization is NOT working
💡 Quick shortcut: You can also look at the “Type” column directly in the Network tab image list. Correctly served images will show webp or avif in that column. If you see png for an image that should have been converted, something in your setup is blocking delivery.
Testing Your Fallback Behavior
Chrome supports both WebP and AVIF natively, so you’ll always see the best format in Chrome. To test fallback behavior:
- Open Firefox (supports WebP, partial AVIF support depending on version). On your image, you should see image/webp in the Content-Type header.
- For legacy browser testing, use BrowserStack to simulate older Safari versions. Those should receive the original PNG.
If your fallback chain is configured correctly, every browser gets the best format it supports and no browser sees a broken image.
Why Your WordPress Images Are Still Serving as PNG (Troubleshooting)
If DevTools is still showing image/png after completing your bulk conversion, here’s what to check in order:
1. Clear Your Cache First
Your caching plugin may be serving a cached page version that was built before your image optimization plugin was fully configured. Clear your entire site cache through your caching plugin, purge your CDN cache if applicable, and then recheck DevTools on a hard reload. This is the cause in the majority of cases.
2. Apache: Check Your .htaccess File
Plugins like Converter for Media work by writing rewrite rules to your .htaccess file on Apache servers. These rules intercept image requests and serve the WebP or AVIF version transparently.
- Connect via FTP and open your .htaccess file in the WordPress root
- Look for a block of rules added by your image optimization plugin
- If the block is missing, deactivate the plugin and reactivate it to trigger a fresh write
- If the file isn’t writable, update the file permissions to 644 and try again
3. Nginx: Rewrite Rules Need Manual Addition
Nginx doesn’t support .htaccess files. Plugins can’t automatically write server configuration rules on Nginx setups. The rewrite rules that intercept image requests and redirect to WebP or AVIF files must be added manually to your Nginx server block configuration.
Check your specific plugin’s documentation for the exact Nginx configuration code. This typically requires SSH access or a request to your host’s support team to apply the changes.
⚠️ Warning: On Cloudways or DigitalOcean App Platform, Nginx configuration changes need to be made at the application server level in your hosting dashboard, not through a WordPress plugin. If you’re on a managed Nginx host, contact their support and ask them to add the WebP/AVIF rewrite rules for you.
4. Purge Your CDN Cache
If you’re using Cloudflare or another CDN, the CDN may be serving cached copies of your images in the original format even after conversion. In Cloudflare, go to Caching > Configuration and click “Purge Everything.” Then retest in DevTools. On BunnyCDN or KeyCDN, use their dashboard’s purge function.
5. AVIF Converting But Not Serving
If you see .webp files in your uploads folder but no .avif files after bulk conversion, your server doesn’t have AVIF library support. This is the silent failure mentioned at the beginning. Your options are:
- Contact your host and ask them to enable AVIF support via ImageMagick or libavif
- Migrate to a host that supports it (most modern managed WordPress hosts do)
- Use WebP only for now, which still delivers significant performance improvement over PNG
Does Bulk Converting Images Slow Down Your Server?
It depends on your host and library size. Here’s the honest breakdown:
Under 500 images: On a VPS or managed host, this completes in a few minutes with no noticeable impact. On shared hosting, run in batches of 100 and take breaks between batches.
500 to 2,000 images: Run during low-traffic hours. Monitor your server CPU via your hosting dashboard. Most plugins include a pause button specifically for this scenario.
Over 2,000 images: Use a cloud-based service (Imagify in cloud mode, Optimole) that offloads all CPU work externally. Or use EWWW Image Optimizer’s background processing mode, which throttles conversion speed to prevent resource spikes.
Going forward: Set your plugin to auto-convert images on upload. Converting a single image at upload time is negligible load. The server impact only matters during the initial one-time bulk conversion.
FAQ: People Also Ask About WordPress Image Optimization
Q: Which is better for WordPress: AVIF or WebP?
A: AVIF is better for file size, typically 20 percent smaller than WebP at the same visual quality. WebP has broader browser support. The practical answer for most sites is to use both: AVIF where supported, WebP as the fallback. A properly configured plugin handles this automatically with no work required on your end after setup.
Q: How do I automatically convert WordPress images to WebP?
A: Install Converter for Media, Imagify, or ShortPixel and enable automatic conversion on upload in the plugin settings. Every new image you upload will be automatically converted and stored alongside the original. Run the built-in bulk conversion tool once to handle your existing library.
Q: Why are my WordPress images not serving as WebP?
A: In order: clear your site cache and retest. Check your .htaccess file for missing rewrite rules (Apache). Ask your host to add Nginx rewrite rules if you’re on Nginx. Purge your CDN cache. Each of these is a separate failure point and they need to be ruled out one at a time.
Q: Does bulk converting images slow down my server?
A: On shared hosting, yes, it can cause temporary slowdowns or timeouts on large libraries. Use a cloud-based processing option or run conversions in small batches. On a VPS or managed host, it’s generally fine but worth scheduling during off-peak hours for libraries over 1,000 images.
Conclusion
Don’t let your images be the reason your site fails Core Web Vitals. Switching to AVIF and WebP delivery is arguably the highest-ROI speed optimization you can do in 2026. It doesn’t require changing your design, modifying your content, or rebuilding anything. You’re just changing the format in which your existing images get delivered.
The 20 minutes it takes to install Converter for Media, run a bulk conversion, and verify in DevTools can shave hundreds of kilobytes off your page weight and meaningfully improve your LCP score. Just make sure you actually verify it’s working using the DevTools method above rather than trusting the plugin’s success counter and moving on.
If you’ve followed the DevTools verification steps and you’re still seeing PNGs being served, you’re likely dealing with an Nginx configuration issue or a CDN that’s caching your original files aggressively. Both of those require server-level access to fix properly. If you need help untangling your server setup or want image optimization configured as part of a broader performance stack, our team that provides WordPress web development services can sort it out without the trial and error.